Showing posts with label data collection. Show all posts

Tuesday, July 30, 2024

Damage Assessment - Hurricane Sandy

Module 5 for GIS Applications continues our focus on Hurricane Sandy and explores damage assessment for the storm's impact in the Garden State.

Our first task was to create a formal hurricane track map showing the path Sandy took from the Caribbean Sea to the Northeastern U.S. The symbology uses custom color coded coordinate points showing the hierarchy of storm intensity. Included are the maximum sustained winds and the barometric pressure shown in 12 hour increments to improve legibility.

Map showing the path of Hurricane Sandy.

The next section of lab 5 was the creation of a damage assessment survey using Survey123. This was a pretty straightforward process, with options to add multiple choice questions pertaining to damage to be documented, a field for describing that damage surveyed, the option to include an image or have the mobile device take a photo, and a required location setting either through GPS or map locator. Following the form creation, we determine what the survey application does after the submission of a completed survey and we set the restrictions on what an individual viewing the survey can see.

Our next task is the preparation of raster data of air photos showing an area of New Jersey both before and after Superstorm Sandy. An array of .SID raster images of pre-storm photos created the first mosaic dataset using geoprocessing. .JPG images of the post-storm photos were compiled into the second mosaic dataset.

With both mosaic datasets in place, we revisit the Flicker and Swipe tools (located in the Compare group below the Mosaic Layer tab), which were previously used in the Remote Sensing course, to alternate the display between the pre and post storm imagery. These are both fast methods to visually compare the two imageries.

Example of the Swipe Tool in ArcGIS Pro
An example of the Swipe tool showing pre-storm imagery above and post-storm imagery below

Step 3 of the lab focuses on the creation of data. For this, we revisit the concept of Domains previously covered in Intro to GIS last Fall. Attribute domains constrain values allowed in an attribute for a table of feature class. Domains create a rule set of acceptable attribute values, or in the case of Module 5, a range of integers associated with predefined aspects of damage assessment:

Domains set for an attribute of a newly created feature class
Helping to ensure data integrity, domains limit the number of acceptable values for a field.

Attribute domains are store in a geodatabase. They can be utilized by multiple feature classes, tables and subtypes in a geodatabase. Through Catalog in ArcGIS Pro, Data Design>Fields, these can be added to an existing feature class.

Using the aforementioned air photos showing Seaside Heights, NJ before and after Superstorm Sandy, we were tasked with conducting damage assessment within a study area of parcel data using the preset domains for the various damage categories. Symbolization uses a continuous color scheme from green for no damage to red for destroyed.

Point feature class showing damage assessment for each parcel within a study area
Damage assessment study area for Superstorm Sandy at Seaside Heights, NJ

Given the four domains of Structure Damage, Inundation, Wind Damage and Structure Type, each parcel within a seaside neighborhood was evaluated for damage based upon the two air photos. This was a tedious task due to relatively low image resolution and long shadows in the post-Sandy aerial imagery. Without in-situ data collection, evaluating parcels for wind damage was impractical given details such as missing roof shingles was not possible.

Expanding our analysis, we aggregate the damage assessment points into buffers of within 100 meters of the coastline, between 100-200 meters and between 200-300 meters. Using the Multi-ring Buffer geoprocessing tool, created the three storm surge zones. Proceeded to run a Spatial Join on the Structure Damage point file with the MultipleRing Buffer polygon file to quantify the damage type by buffer zone. The Summary Statistics geoprocessing tool does the tabulation for us:

Hurricane Sandy Damage Assessment - GIS Applications
The final results of our damage analysis confirms the penetration of Superstorm Sandy's storm surge varied as the distance from the coastline increased from 100 to 300 meters. Structures facing the ocean were generally pulverized, while buildings located around 300 meters inland fared much better, some with seemingly no visible damage. This damage estimation appears to be consistent along other parts of the barrier island where the elevation and slope are similar. Exceptions were noted, such as further south of the study area in Seaside Heights, New Jersey, where the barrier provided by a boardwalk and two piers protected adjoining neighborhood areas from the storm surge.

Monday, September 11, 2023

ArcGIS Field Maps - Tampa area route markers

Three weeks into GIS4043, we were introduced to a package including data collection, ArcGIS Online, Story Maps and ArcGIS Field Maps. While I have worked with ArcGIS Online creating state maps with data from various Departments of Transportation for research and write-ups for pages on AARoads, a lot of this was new to me.

The purpose of this week's lab is to create a Feature Class with data collected with a mobile unit using ArcGIS Field Maps. Then with that data, creating a web layer to be shared online by multiple methods.

The initial steps in the lab were to create an empty project and utilize Domains. Domains are predetermined options for data collection in the field. For this project, we were to select an aspect of Public Safety, either within a building complex or in a geographical area.

Seeing the opportunity to couple the data collection with an aspect of AARoads, I chose Route Sign Markers as the Public Safety aspect to collect. The clear and consistent marking of numbered routes not only aids in motorist navigation but also indicates that a street or highway is part of a larger system maintained by either the county or state. Clearly marked routes reduce motorist confusion, allowing more attention to be devoted to driving in place of navigation. Poorly marked routes, or ones not marked at all can lead to last minute decisions as far as where to turn or frustration with taking the wrong road altogether.

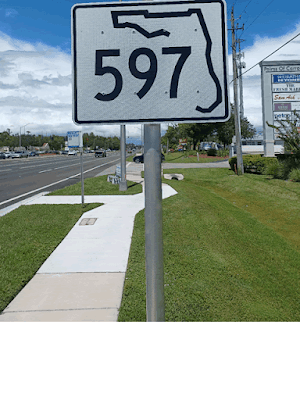
New Florida State Road 597 marker at Carrollwood
Florida State Road 597 marker in excellent condition
Weathered CR 582A shield on CR 581 south
Faded CR 582 marker in North Tampa
 

Furthermore, GPS based navigation systems such as Google Maps and TomTom devices tend to favor referencing numbered routes over named streets. Therefore having consistently signed route markers working in tandem with street names is better from a motorist perspective. Well marked routes can also aid in hurricane evacuations, keep trucks on designated routes, and provide signed alternates due to congestion on primary routes.

With that in mind, the Domain set up for this lab is "condition", with the field providing options (Code) for excellent, fair and poor. The field type was set to text, and a short description of each Code was entered. This set of criteria works out well with route sign markers, as part of my inspiration for what to collect is because FDOT similarly does field collection where every sign within a district is cataloged in the field and rated based upon its condition.

Following the Domains creation, next was the creation of a new Feature Class that will be populated with the data collected in the field. Having some knowledge of MySQL databases made understanding the need for the Data Type of "Condition" to be set as Text, so it matched the Domain field type set earlier. Other fields added included Photo with the Data Type of Raster and Notes with the Data Type of Text.

With the new Feature Class added to our project Geodatabase, I applied the Condition Domain to the Condition Field. This allows the predetermined Conditions to be used in the field. I then shared the empty Feature Class as a Web Layer with it configured to allow editing. Following a hiccup where the unique numeric ID was not preset (another aspect of MySQL coming into play), the page was published to the Content section of my ArcGIS Online account.

Added the Field Maps application to my Samsung phone via the Google Play Store. Once logged in, data collection could commence! My initial point was a test in the office of a prototype road sign made for me. With the success of that, the next point was within walking distance along U.S. 41.

For the remainder of the points, I wanted a variety of examples allowing me to categorize some signs as fair and others as poor. Knowing where several arrays of such were, my brother, who is a Professional Surveyor, accompanied me as we drove to collect nearly a dozen points. He mentioned Survey Grade collection, which is placing the collection device as close to the data to be cataloged as possible. So I went with that method, placing my phone against each sign support post for the collection.

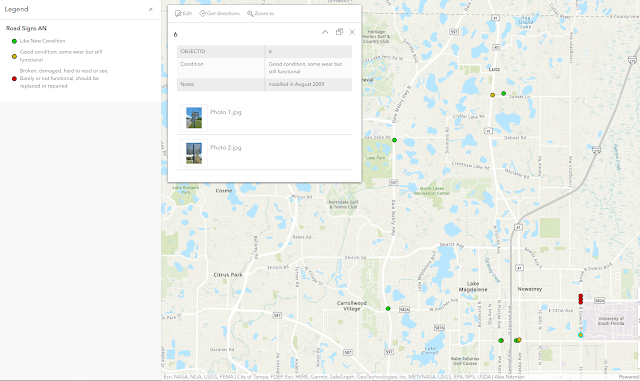
Lutz/North Tampa Web Map
The various route markers we collected throughout the Lutz and North Tampa area


No major difficulty with collecting the points. The only somewhat confusing aspect was that even after touching the Check button in Field Maps to finalize a data point, occasionally the data entry dialog remained. This initially led me to question whether or not the data I entered went through.

Once back at the PC, verified that the data collection was successful on the Web Map on ArcGIS Online. Opened the map via Portal in ArcGIS Pro as well, noting that the pop up information on the software omits the photo thumbnail for each point. Also created a Map Package from the map layer and KML files for Google Earth.

The finished Web Map was posted at https://pns.maps.arcgis.com/apps/mapviewer/index.html?webmap=acd601fc59ab435391f633fe99df7e66